

Installing a heat pump can feel overwhelming when you face technical complexities like refrigerant handling, electrical wiring, and code compliance. Many homeowners worry about costly mistakes that lead to inefficiency or system failure. This guide breaks down the entire process into clear, actionable steps so you can confidently complete your installation while avoiding the most common errors that plague DIY projects.
Table of Contents
- Prerequisites And What You Need
- Step-By-Step Installation Guide
- Safety And Code Compliance
- Common Mistakes And Troubleshooting
- Expected Timelines And Costs
- Post-Installation Testing And Outcomes
- Get Expert Help With Your Heat Pump Installation
- Frequently Asked Questions About Heat Pump Installation
Key Takeaways
| Point | Details |
|---|---|
| Essential Preparation | Correct tools and local code knowledge prevent costly installation mistakes and delays. |
| Step-by-Step Process | Instructions cover site prep, mounting, refrigerant lines, wiring, and testing for complete installation. |
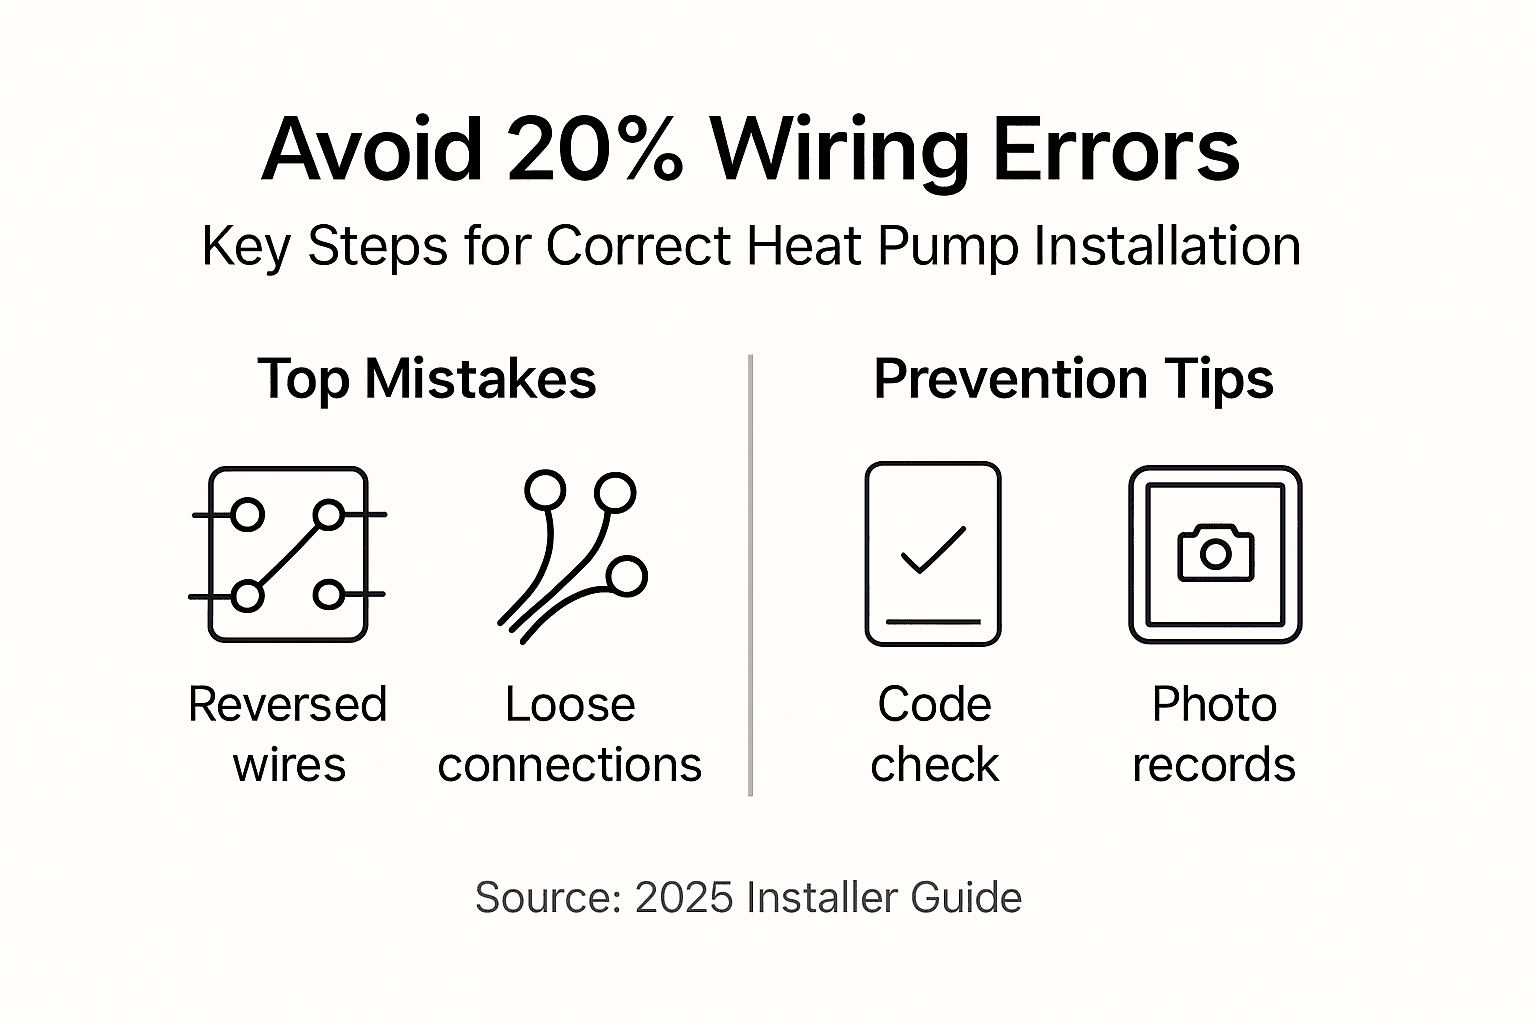
| Common Error Rates | Wiring mistakes cause 20% of failures while brazing leaks account for 15% of installation problems. |
| Time and Investment | Installation takes 8–12 hours with average costs ranging from $4,000 to $8,000. |
| Code Compliance | Following NEC Article 440 and local safety codes ensures legal compliance and efficient performance. |
Prerequisites and What You Need
Before you start any physical work, a thorough site assessment determines the correct heat pump size for your home. Calculate your heating and cooling load based on square footage, insulation levels, and climate zone. Undersizing leads to inadequate comfort while oversizing wastes energy and increases costs.
Gather your essential tools for heat pump installation before beginning work. You need a vacuum pump for evacuating refrigerant lines, manifold gauge set for pressure readings, refrigerant scale for accurate charging, pipe cutter for clean line cuts, torque wrenches for proper connections, drill with appropriate bits, and multimeter for electrical testing. Having everything ready prevents frustrating delays mid-installation.
Local permitting requirements vary by jurisdiction and must be confirmed early. Contact your municipal building department to understand what permits you need and when inspections are required. Some areas mandate licensed contractors for refrigerant work or electrical connections. Skipping this step can result in fines, failed inspections, or insurance claim denials if problems arise later.
Pro Tip: Create a detailed checklist of every tool, material, and permit before starting. This prevents mid-project runs to the hardware store and keeps your installation on schedule.
Required Tools and Materials
| Category | Items | Purpose |
|---|---|---|
| Refrigerant Tools | Vacuum pump, manifold gauges, refrigerant scale | Line evacuation and charging |
| Hand Tools | Pipe cutter, flaring tool, torque wrenches, drill | Cutting and connecting components |
| Electrical | Multimeter, wire strippers, conduit bender | Safe wiring and testing |
| Safety Gear | Gloves, goggles, refrigerant handling equipment | Personal protection |
Your heat pump replacement tutorial provides additional Canadian-specific guidance on tool selection and preparation. Prepare a clean, organized workspace near both indoor and outdoor unit locations. This reduces contamination risk and improves workflow efficiency during critical steps like brazing and vacuum testing.
Step-by-Step Installation Guide
Start with precise load calculations using Manual J methodology or similar recognized standards. These calculations determine the correct BTU capacity your home requires. Input factors include wall and ceiling insulation R-values, window types and orientation, air infiltration rates, and local climate data. Incorrect sizing is one of the most expensive mistakes you can make.
Obtain all required permits and schedule inspection appointments before purchasing equipment. Some jurisdictions require plan approval before work begins. Review manufacturer installation manuals thoroughly to understand specific requirements for your chosen model. Each brand has unique mounting specifications and clearance requirements.
Mount the outdoor unit on a level concrete pad or wall brackets that meet manufacturer weight and vibration specifications. Ensure at least 24 inches of clearance on the service side and 12 inches on other sides for adequate airflow. The indoor air handler needs secure mounting to wall studs or ceiling joists with proper drainage provisions for condensate removal.
Refrigerant line installation requires careful attention to prevent contamination. Cut copper tubing with a proper pipe cutter to avoid metal shavings inside the lines. Deburr all cuts thoroughly and keep line sets capped until connection. Braze joints using silver alloy brazing rod while purging lines with nitrogen to prevent oxidation inside the copper. This step prevents future blockages that reduce efficiency.
Pro Tip: Always flow nitrogen through refrigerant lines during brazing at 3-5 PSI. This inert gas prevents oxidation that creates black scale inside copper tubing, which can damage the compressor.
Evacuate the system using a two-stage vacuum pump capable of reaching 500 microns or lower. Connect your vacuum pump to both the liquid and suction service ports. Run the pump for at least 30 minutes, then perform a standing vacuum test by closing valves and monitoring pressure for 15 minutes. Pressure rise above 500 microns indicates a leak or moisture presence requiring additional evacuation.
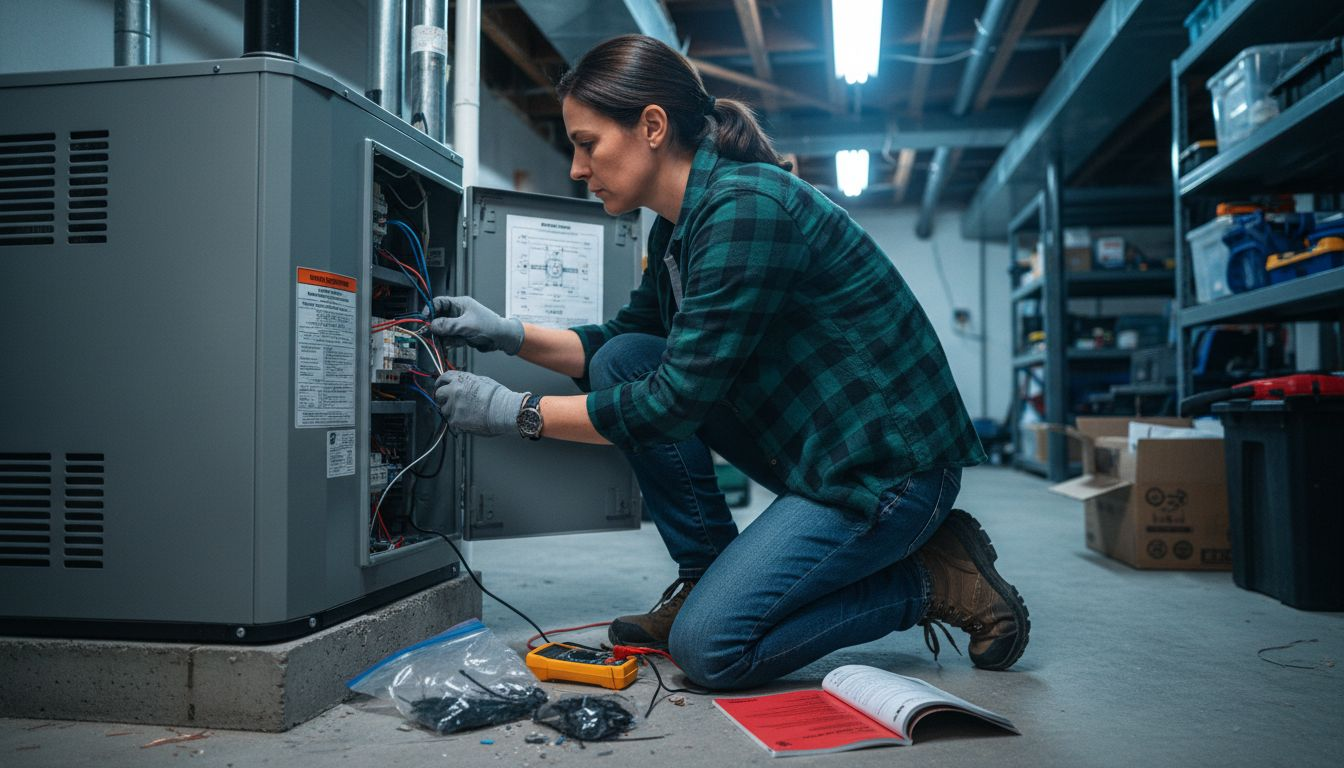
Electrical Wiring Sequence
- Install disconnect box within sight of outdoor unit per NEC requirements
- Run appropriately sized wire from electrical panel to disconnect (typically 10 AWG for most residential units)
- Connect power supply to outdoor unit following wiring diagram exactly
- Run low voltage control wire between indoor and outdoor units
- Connect thermostat wiring according to manufacturer color codes
- Verify all connections are tight and properly insulated
- Test voltage at all connection points before energizing system
Your heat pump wiring guide offers detailed Canadian electrical code considerations. After wiring completion, charge the system according to manufacturer specifications using subcooling or superheat method as appropriate for your unit type. Most modern systems use subcooling for TXV-equipped units. Measure liquid line temperature and pressure, then calculate subcooling by subtracting liquid line temperature from saturation temperature at measured pressure.
Complete startup by following the manufacturer commissioning checklist. Verify proper airflow, check for unusual noises or vibrations, and monitor system pressures during initial operation. Your heat pump repair workflow resource helps identify potential issues during testing.
Safety and Code Compliance
Adherence to NEC Article 440 is mandatory for heat pump electrical installations. This code section specifically addresses motor-compressor equipment and requires proper overcurrent protection, disconnect means within sight of equipment, and conductor sizing based on motor compressor rated load current plus additional loads. Using the wrong wire gauge or breaker size creates serious fire hazards.
Local permits ensure your installation meets municipal building and electrical codes. Most jurisdictions require at least two inspections: one for electrical work and one for final system operation. Schedule these inspections promptly to avoid project delays. Inspectors verify proper refrigerant handling certification, correct electrical connections, adequate ventilation clearances, and proper condensate drainage.
Refrigerant handling requires EPA Section 608 certification for anyone who opens sealed refrigerant circuits. This federal requirement exists because improper handling damages the environment and poses health risks. Certified technicians understand proper recovery, evacuation, and charging procedures that prevent refrigerant loss and ensure optimal system performance.
“Electrical wiring mistakes account for 20% of heat pump installation failures. Following NEC Article 440 requirements for disconnect location, wire sizing, and overcurrent protection prevents these dangerous and costly errors.”
Pro Tip: Take photos of all wiring connections before covering them with panels. These images prove invaluable for future troubleshooting and satisfy some inspector requirements for documentation.
Your heat pump wiring guide provides specific guidance on meeting Canadian electrical standards. Never skip ground wire connections, as proper grounding protects against electrical shock and equipment damage from power surges. Use properly rated disconnect boxes and ensure all outdoor electrical components have appropriate weatherproof enclosures.
Common Mistakes and Troubleshooting
Poor refrigerant line brazing leads to leaks in about 15% of installations and represents one of the costliest errors. Always use silver brazing alloy, never soft solder, for refrigerant connections. Maintain proper torch flame size and heat the copper evenly around the joint. After brazing, pressure test all connections with nitrogen at 400-450 PSI for at least 15 minutes before evacuation.
Insufficient evacuation causes 12% of installation failures by leaving moisture in the system. Water reacts with refrigerant and oil to form acids that corrode internal components and destroy compressors. Always evacuate to 500 microns or lower and perform a standing vacuum test. If pressure rises above 1000 microns during the test, continue evacuating or locate leaks before proceeding.
Electrical connection errors create immediate and long-term problems. Common mistakes include reversed line and load connections at the contactor, improper wire gauge for circuit amperage, missing or incorrectly sized fuses, and loose terminal connections. Every connection must be torqued to manufacturer specifications. Loose connections create resistance, generate heat, and can start electrical fires.
Permit and inspection oversights cause legal complications. Some homeowners skip permits to save fees or avoid inspections, but this decision backfires when selling the home or filing insurance claims. Unpermitted work must often be redone to pass inspection, doubling your costs. Always obtain proper permits and cooperate fully with inspectors.
Troubleshooting Checklist
- Verify power supply voltage matches unit requirements at disconnect box
- Check all electrical connections for tightness and proper wire gauge
- Measure refrigerant pressures and compare to manufacturer charge charts
- Inspect all brazed joints for signs of leaks using electronic detector or soap solution
- Confirm thermostat wiring matches manufacturer color code diagram
- Test system in both heating and cooling modes for proper operation
- Monitor amperage draw on compressor and fan motors against nameplate ratings
Your guide on common heat pump installation mistakes expands on these troubleshooting steps. When problems occur, systematic testing identifies issues faster than random part replacement. Use your multimeter to verify voltage, check continuity, and measure resistance at suspected problem areas.
Expected Timelines and Costs
Typical residential heat pump installation requires 8 to 12 hours for an experienced installer working on a straightforward replacement. New installations with significant electrical upgrades, ductwork modifications, or difficult access can extend to 16-20 hours. Breaking the project into preparation, installation, and testing phases helps manage realistic timeframes.
Average installation costs range between $4,000 and $8,000 depending on system size and installation complexity. This includes equipment, materials, permits, and labor. Larger capacity systems cost more, as do installations requiring extensive electrical service upgrades or ductwork modifications. Geographic location significantly impacts labor rates.
Cost Breakdown
| Component | Cost Range | Notes |
|---|---|---|
| Equipment | $2,000 – $4,500 | Varies by capacity and efficiency rating |
| Labor | $1,200 – $2,500 | Based on 8-12 hour installation |
| Materials | $300 – $600 | Refrigerant lines, electrical components, mounting hardware |
| Permits/Inspections | $150 – $400 | Varies by jurisdiction |
| Total | $4,000 – $8,000 | Complete professional installation |
Improper installation reduces system efficiency by up to 30%, dramatically increasing your operating costs. A system that should cost $800 annually to operate might cost $1,040 or more when incorrectly installed. Over a 15-year equipment lifespan, poor installation wastes thousands in unnecessary energy costs.
Your heat pump installation timeline breaks down each phase with specific duration estimates. Budget extra time for unexpected complications like hidden electrical issues or structural modifications. Planning adequate time prevents rushed work that leads to mistakes.
Pro Tip: Get multiple quotes from licensed contractors and compare not just price but also warranty coverage, installer certifications, and customer references. The lowest bid often reflects cut corners that cost more long-term.
Post-Installation Testing and Outcomes
Measure superheat and subcooling within manufacturer-specified tolerances of ±3°F to validate correct refrigerant charge. For TXV systems, target subcooling typically ranges from 8-12°F. For fixed orifice systems, superheat should be 10-15°F depending on outdoor temperature. These measurements confirm your system has the precise refrigerant amount for optimal efficiency.
Perform comprehensive leak testing using electronic refrigerant detectors at all brazed joints, flare connections, and service ports. Even small leaks waste refrigerant, reduce efficiency, and eventually cause system failure. Address any detected leaks immediately by recovering refrigerant, repairing the joint, and re-evacuating before recharging.
Functional testing verifies proper operation in all modes. Run heating cycles and confirm consistent warm air delivery, appropriate compressor and fan operation, and defrost cycle initiation when needed. Switch to cooling mode and verify cold air production, proper condensate drainage, and stable system pressures. Monitor for unusual noises, vibrations, or odors that indicate problems.
Certified technician involvement raises installation success rates above 90% compared to DIY attempts. Professional installers have specialized training, proper tools, and experience recognizing potential issues before they become failures. Their work typically includes warranties that protect your investment.
Final Verification Steps
- Document baseline superheat/subcooling measurements for future reference
- Record system operating pressures at specific outdoor temperatures
- Verify all electrical connections are tight and properly terminated
- Confirm adequate airflow at all supply registers
- Test thermostat operation in all modes and fan settings
- Review maintenance requirements with homeowner
- Provide manufacturer warranty registration and contact information
Your heat pump troubleshooting guide helps identify issues during initial testing and throughout system life. Properly tested installations deliver promised energy savings, maintain consistent comfort, and extend equipment lifespan beyond manufacturer estimates. Regular maintenance based on your initial installation quality keeps the system running efficiently for 15-20 years.
Get Expert Help With Your Heat Pump Installation
Hiring experienced professionals ensures your installation meets all electrical codes and avoids the costly mistakes that plague DIY projects. CoolFix offers comprehensive heat pump installation support with detailed guidance tailored specifically for Canadian homeowners. Our heat pump replacement tutorial walks you through every decision point.

Access our complete heat pump installation timeline to plan your project accurately. Our seasoned technicians enhance system efficiency through proper installation techniques proven to maximize equipment lifespan and minimize operating costs. Start your installation journey confidently with our expert HVAC services designed for optimal performance.
Frequently Asked Questions About Heat Pump Installation
How long does a typical heat pump installation take?
A standard replacement installation takes 8-12 hours for experienced installers. New installations requiring electrical upgrades or ductwork modifications can extend to 16-20 hours depending on complexity.
What tools are essential for a DIY heat pump install?
You need a vacuum pump, manifold gauge set, refrigerant scale, pipe cutter, torque wrenches, drill, and multimeter. Refrigerant handling also requires EPA Section 608 certification and specialized safety equipment.
Why is proper electrical wiring critical for heat pumps?
Incorrect wiring causes 20% of installation failures and creates serious fire hazards. Following NEC Article 440 requirements for wire sizing, overcurrent protection, and disconnect placement ensures safe, reliable operation.
How can poor brazing affect my heat pump’s performance?
Poor brazing leads to refrigerant leaks in 15% of installations, causing gradual efficiency loss and eventual system failure. Proper silver brazing with nitrogen purge prevents leaks and oxidation damage.
What are signs my heat pump installation needs troubleshooting?
Watch for inadequate heating or cooling, unusual noises, frequent cycling, high energy bills, or ice buildup on outdoor unit. These symptoms indicate problems with refrigerant charge, airflow, or electrical connections requiring immediate attention.
Recommended
- Heat Pump Wiring Guide for Reliable Canadian Installs – CoolFix Appliance & HVAC Service
- 6 Common Heat Pump Installation Mistakes to Avoid – CoolFix Appliance & HVAC Service
- Articles – CoolFix Appliance & HVAC Service
- Heat Pump Load Calculation: Master 12% Energy Savings – CoolFix Appliance & HVAC Service
- Selecting Furnace Filters: Selecting Furnace Filters
0 Comments