

TL;DR:
- Detecting refrigerant leaks early prevents system damage and costly repairs.
- Using a systematic workflow with proper tools ensures accurate leak identification.
- Professional, certified technicians are essential for safe and compliant leak repairs.
A heat pump working harder than usual, energy bills creeping upward, and rooms that never quite reach the right temperature — these are the quiet signals of a refrigerant leak. Left unchecked, even a small leak can strain your compressor, shorten your system’s lifespan, and turn a modest repair into a $3,000-plus replacement. This guide walks you through the tools you need, a clear detection workflow, how to troubleshoot common mistakes, and how to verify that repairs actually hold. Whether you manage one home or several rental units, understanding this process puts you in control.
Table of Contents
- Essential tools and prerequisites for leak detection
- Step-by-step heat pump leak detection workflow
- Troubleshooting, common mistakes, and safety considerations
- Verifying repairs and maintaining leak-free performance
- What most guides overlook about leak detection workflows
- Get professional help with heat pump leak detection and repairs
- Frequently asked questions
Key Takeaways
| Point | Details |
|---|---|
| Prioritise electronic detection | Electronic leak detectors give fastest, most sensitive results for refrigerant leaks. |
| Never DIY refrigerant handling | Certified technicians are required to repair leaks due to regulatory and safety risks. |
| Maintain documented workflow | Log all findings and repairs for compliance, warranty, and long-term efficiency. |
| Schedule annual maintenance | Routine checks minimise risk of expensive compressor damage and costly repairs. |
| Confirm repairs with pressure test | After fixing leaks, always verify with a pressure test and secondary scan for assurance. |
Essential tools and prerequisites for leak detection
Before you touch anything, gather the right equipment. Skipping this step is one of the most common reasons leak detection fails or produces unreliable results. At minimum, you will need an electronic refrigerant detector, a UV dye kit, a soap solution, a nitrogen or pressure test gauge, a flashlight, chemical-resistant gloves, and appropriate personal protective equipment (PPE) such as safety glasses.
Not all detection methods work equally well for every situation. Here is a quick comparison to help you choose:
| Method | Best for | Detection limit | Cost |
|---|---|---|---|
| Electronic detector | Small, hidden leaks | ~6 g/year | $150–$600 |
| UV dye kit | Confirming persistent leaks | ~0.5 oz/year | $30–$80 |
| Soap solution | Gross, visible leaks | >0.5 oz/year | Under $10 |
| Nitrogen pressure test | Post-repair verification | Any size | $50–$150 |
Electronic detectors are the most sensitive option. As HVAC detection methods confirm, these tools sense refrigerant in the air using heated diode technology for halogens, infrared absorption, or ultrasonic sound detection, while UV dye circulates through the system and glows visibly under a UV light. Each method has a role, and the best results come from combining them.
One critical prerequisite: refrigerant handling is regulated. In Canada, technicians must hold EPA 608 certification or the Canadian equivalent before touching refrigerant lines. As a homeowner or property manager, your role is detection and documentation, not refrigerant recovery or recharging. Leave that to a licensed technician.
Review your heat pump maintenance checklist before starting, and consult a heat pump maintenance guide if you are unfamiliar with your system’s layout.
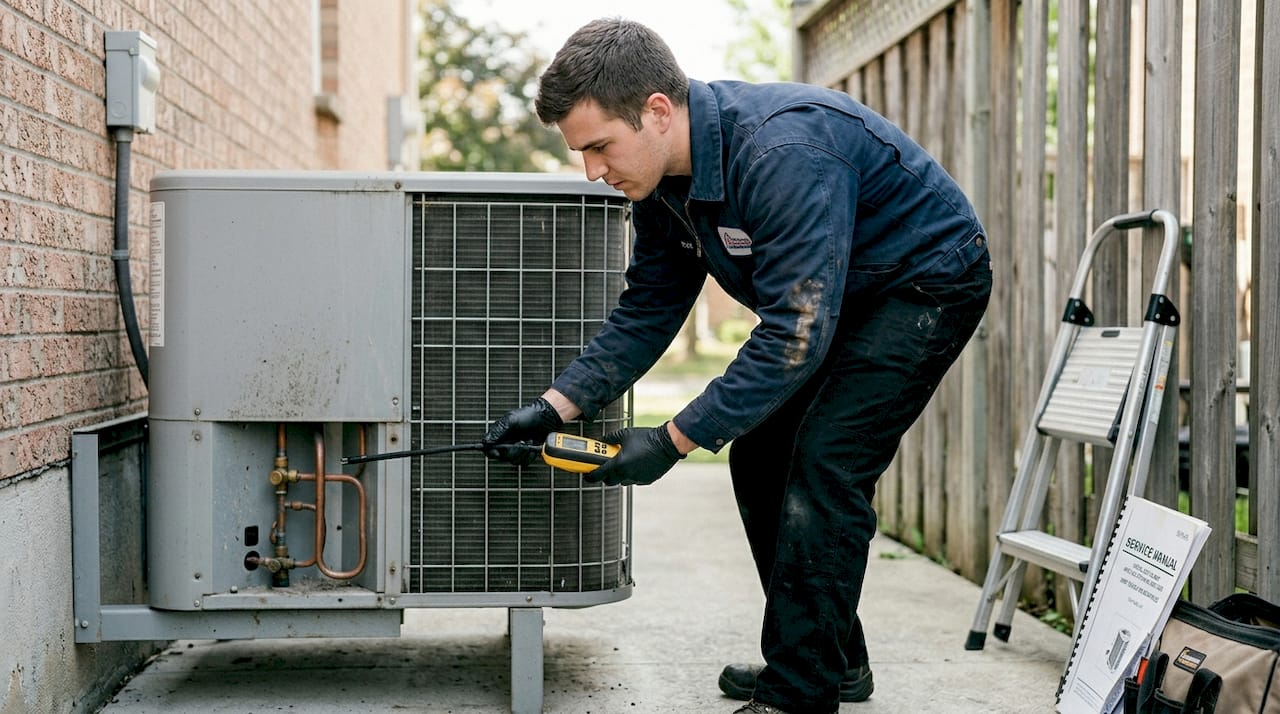
Pro Tip: Always begin scanning at the top of the coil and work your way downward. Refrigerant vapour is heavier than air, so it settles low. Starting high prevents you from triggering false readings before you have located the actual source.
Knowing what’s needed, let’s break down the step-by-step detection process itself.
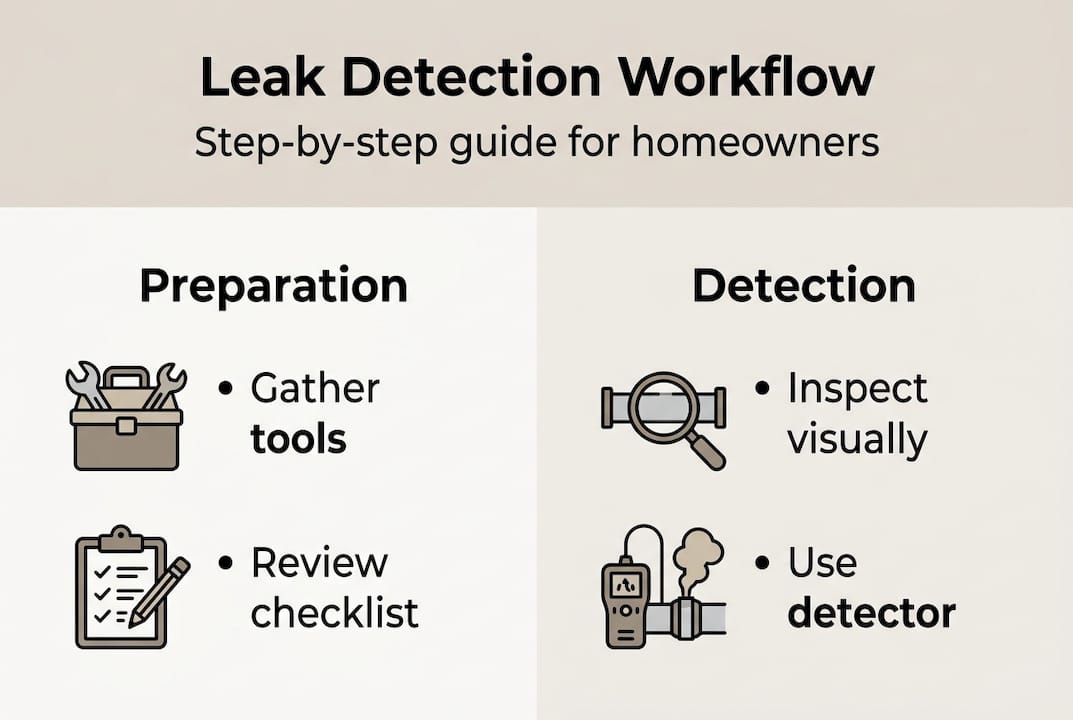
Step-by-step heat pump leak detection workflow
A systematic approach matters more than the tools themselves. Rushing through this process or skipping steps leads to missed leaks and repeat service calls.
-
Visual inspection first. Walk around the unit and look for oil stains on or near the coil, frost buildup in unusual spots, and corrosion around fittings or valves. These physical signs often point directly to the leak source before any instrument is used.
-
Electronic detector scan. Power on your detector and allow it to warm up fully. Move the probe slowly along the coil, refrigerant lines, Schrader valves, and service connections. As refrigerant detection guidance recommends, start high on the coil and move downward since refrigerant is heavier than air.
-
UV dye deployment. If the electronic scan is inconclusive, a certified technician can introduce UV dye into the system. Run the heat pump for at least 15 minutes, then inspect all components under a UV lamp. A persistent glow confirms the leak location.
-
Soap solution check. Apply a soap solution to fittings, joints, and valves. Bubbles forming at any point signal a gross leak. This method is best for confirming what you already suspect, not for finding small leaks.
-
Nitrogen pressure test. After a repair, a technician pressurises the system with dry nitrogen and monitors for pressure drop. This step verifies the repair held and the system is sealed.
Here is a summary of each step’s practical details:
| Step | Method | Detection limit | Estimated cost |
|---|---|---|---|
| Visual inspection | Eyes and flashlight | Gross leaks only | Free |
| Electronic scan | Heated diode or IR | ~6 g/year | Tool cost only |
| UV dye check | UV lamp and dye | ~0.5 oz/year | $30–$80 |
| Soap solution | Soap and water | >0.5 oz/year | Under $10 |
| Nitrogen pressure test | Pressure gauge | Any size | $50–$150 |
Pro Tip: Electronic detection is non-invasive and gives real-time feedback, making it the ideal first pass. Always confirm a positive reading with a secondary method before calling a technician, so you arrive with useful information rather than a vague concern.
Repair costs range from $200 to over $1,000 depending on leak severity, and systems that have lost more than 10% of their refrigerant charge should be repaired promptly to avoid compressor damage. For guidance on what comes next, review this heat pump leak repair guide and the heat pump component checklist.
Safety reminder: Never attempt to recover, recharge, or handle refrigerant yourself. This requires certification and specialised equipment. Non-compliance carries significant regulatory penalties and poses serious safety risks.
Understand the workflow — now, let’s troubleshoot the challenges and common mistakes that arise during leak detection.
Troubleshooting, common mistakes, and safety considerations
Even with the right tools and a clear workflow, things go wrong. Knowing where the process breaks down saves you time and prevents a misdiagnosis.
Common mistakes to avoid:
- Rushing the scan without allowing the detector to warm up fully
- Skipping calibration checks before each use
- Scanning in windy or high-airflow conditions that disperse refrigerant before the sensor registers it
- Assuming a single positive reading is definitive without confirming with a second method
- Ignoring airflow patterns around the coil, which can carry refrigerant away from the actual leak source
False positives are a real issue with electronic detectors. Sensor reliability data shows that heated diode sensors have a service life of roughly 300 hours, while infrared sensors last considerably longer. Auto-zeroing functions, which recalibrate the sensor to the ambient environment, can mask a leak if the background refrigerant concentration is already elevated. Always test in a well-ventilated area and allow the sensor to stabilise before scanning.
For property managers overseeing multiple units, leak detection expert insights suggest investing in smart monitoring systems that flag anomalies between scheduled inspections. This approach catches slow leaks before they become compressor failures.
Pro Tip: Keep a dedicated log for every leak detection session. Record the date, the areas scanned, any readings, and the outcome. This documentation supports warranty claims, satisfies regulatory requirements, and gives future technicians a clear picture of the system’s history.
Regulatory reminder: As compliance guidelines make clear, homeowners and property managers must never handle refrigerant themselves. Monitor symptoms, schedule annual heat pump maintenance, and always engage a certified technician for any refrigerant-related work.
The financial stakes are real. Repair costs run from $200 to $1,000 or more, and a failed compressor can cost $3,000 or more to replace. Reviewing heat pump safety features can also help you understand what your system’s built-in protections cover and where they fall short.
With troubleshooting complete, it’s time to confirm your repair and ensure your heat pump is running efficiently.
Verifying repairs and maintaining leak-free performance
A repair is not complete until it has been verified. This step is where many homeowners stop short, assuming the technician’s work speaks for itself. It does not. You need confirmation.
Steps to verify a repair:
- Nitrogen pressure test. Ask your technician to pressurise the system with dry nitrogen and hold pressure for at least 30 minutes. Any drop indicates a remaining leak.
- Electronic re-scan. Run the electronic detector over all previously affected areas. A clean scan after a pressure hold is strong evidence the repair held.
- Symptom review. Monitor the system for 48 to 72 hours after the repair. Restored efficiency, stable temperatures, and no frost buildup are positive indicators.
- Documentation. Record the repair details immediately while the information is fresh.
What to log after every repair:
- Location of the leak (component, fitting, or line)
- Detection method used and readings recorded
- Repair method applied (brazing, sealant, part replacement)
- Technician’s name, certification number, and company
- Nitrogen test pressure and hold time
- Date of repair and next recommended inspection
Pro Tip: Even though residential systems face fewer strict repair timelines than commercial ones, early detection and prompt repair protect your compressor from failure costs exceeding $3,000. Thorough records also support future warranty claims and insurance disputes.
After verification, set a reminder for your next annual inspection. For multi-unit properties, consider a heat pump maintenance workflow that schedules checks across all units on a rotating basis. Ongoing monitoring paired with heat pump repair tips tailored to Canadian climates keeps your systems performing efficiently year-round.
Beyond technical workflow, expert opinions reveal nuances most guides miss.
What most guides overlook about leak detection workflows
Most leak detection guides focus on the tools and skip the discipline. The real differentiator between a homeowner who catches a leak early and one who faces a compressor replacement is not the detector they used. It is whether they followed a repeatable, documented process.
Documentation is treated as an afterthought in most guides, but it is actually the backbone of effective leak management. Without records, you cannot track whether a repair held, support a warranty claim, or demonstrate compliance to a regulator. For property managers especially, this is not optional.
The other overlooked issue is workflow sequencing. Many people reach for the soap solution first because it is cheap and familiar. But soap only catches gross leaks. Starting with an electronic scan and confirming with dye or soap is the correct order, not the reverse.
Newer refrigerants like R290 are also changing the landscape. Flammable refrigerants demand specialised tools, enhanced ventilation, and technicians with specific training. The old toolkit and old habits do not transfer safely.
As we see it, the best workflow is one you can repeat and document — protecting your investment and maintaining peace of mind. Never delay calling a professional, especially when symptoms point to a slow leak. Review heat pump leak repair insights to understand what a qualified technician should be doing on your behalf.
Get professional help with heat pump leak detection and repairs
Detecting a leak is only half the job. The other half is making sure it gets fixed correctly, documented thoroughly, and followed up with a maintenance plan that prevents the next one.

At CoolFix, we offer expert diagnostics, full leak detection workflows, and certified repairs for Canadian homeowners and property managers. Whether you need a one-time assessment or ongoing monitoring for a multi-unit property, our team ensures regulatory compliance and protects your system from costly compressor failures. Explore our heat pump replacement tutorial if your system is beyond repair, or book directly through our appliance repair services to schedule your next inspection.
Frequently asked questions
Which heat pump leak detection method is best for small leaks?
Electronic detectors offer the highest sensitivity for small leaks, capable of sensing roughly 6 grams per year, while UV dye is best used to confirm a persistent issue the detector flagged.
Can I repair a refrigerant leak on my heat pump myself?
No. Refrigerant handling requires a certified technician due to safety risks and regulatory requirements. As compliance guidelines confirm, homeowners should focus on symptom monitoring and scheduling professional maintenance.
How often should leak detection be performed for heat pumps?
Annual inspections are the baseline recommendation. Schedule an additional check if you notice reduced efficiency, unusual frost, or hissing sounds, as annual maintenance guidelines advise.
What are the signs of a refrigerant leak in a heat pump?
Oil stains near the coil, frost in unusual locations, weak heating or cooling output, and hissing sounds are the most common indicators. A visual inspection often reveals these signs before any instrument is needed.
Do leak detection workflow steps differ for newer refrigerants like R290?
Yes. Flammable refrigerants like R290 require specialised tools and ventilation, and technicians must have specific training before working with them safely.
Recommended
- How to Repair Heat Pump Leaks for Reliable Results – CoolFix Appliance & HVAC Service
- Heat Pump Refrigerant Leaks – Mitigating Risks in Canada – CoolFix Appliance & HVAC Service
- Step by Step Heat Pump Repair for Canadian Homeowners – CoolFix Appliance & HVAC Service
- Heat Pump Troubleshooting Guide for Canadian Technicians – CoolFix Appliance & HVAC Service
- Emergency heating repair: Thames Valley homeowner’s guide
0 Comments